{this moment} - A Friday ritual. A single photo - no words - capturing a moment from the week. A simple, special, extraordinary moment. A moment I want to pause, savor and remember. (from SouleMama)
Friday, January 25, 2013
Thursday, January 24, 2013
The Little Miss Austen "Pride and Prejudice" Counting Primer
I chanced upon this book at a local children's book store this afternoon, and knew immediately that I must buy it. In case you haven't heard, this year is the 200th anniversary of the first publication of Jane Austen's Pride and Prejudice. How, then, could I resist this board book?
I absolutely love the illustrations for this. They're bright, funny, and full of old-fashioned embellishments. This page is my favorite: four marriage proposals. I especially love the funny bits of dialog for each one (click on it to enlarge if you need to).
I also like these portraits of the five Bennet sisters:
I haven't actually read this to Abigail yet, as she fell asleep in the car and is still out (which is why I have a moment to write this), but even if she doesn't take to it, I will keep it because it amuses me so greatly. They had other classic books turned into board books too, including Jane Eyre, which is my favorite book ever. But that one wasn't as funny, and some of the pictures were actually a little scary (it's a much darker novel, after all), so I didn't get it.
(Written by Jennifer Adams, illustrated by Alison Oliver)
Saturday, January 19, 2013
Featured on "Share It Saturday"
Hey, check it out! My "Winter Game" post was so popular last week when I added it to the blog sharing party on Teach Beside Me that they featured it in their post this week! It looks like there are lots and lots of great new things linked this week, all sorts of recipes and school ideas, etc. Go there and see if there are any that interest you!
Friday, January 18, 2013
Cranberry Cobbler
I made this for my husband's birthday instead of cake because we never eat a whole cake, and he's not that fond of really sweet things anyway. This is a great blend of tart and sweet, and it's quick and easy too.
Cranberry Cobbler
Ingredients:
6 Tbsp butter -- melted
1 1/4 cups fresh or frozen cranberries (thaw if frozen)
3/4 cup plus 1 Tbsp sugar -- divided
1 cup all-purpose flour
1 1/4 tsp baking powder
1/2 tsp salt
1/2 cup whole milk
1 large egg
Directions:
Preheat oven to 350. Grease an 8" x 8" glass baking dish and set aside. In a small bowl, stir together cranberries and 1 Tbsp sugar.
In a large bowl, whisk together the flour, baking powder, salt, and 3/4 cup sugar. In another small bowl, whisk together the milk and egg, then whisk in the melted butter. Whisk wet mixture into dry mixture until combined.
Pour batter into pan and sprinkle cranberries and any loose sugar on top. Bake 25 to 30 minutes, or until center springs back when touched. Let cool 15 minutes before serving.
Saturday, January 12, 2013
Penguin Bulletin Board
I got a free calendar from some charity or other last month -- NWF or WWF or some similar wildlife-supporting organization -- that had twelve lovely pictures of wild animals. But it was a small calendar, 8"x10" or so, and I like the big 12"x12" calendars because I write all my appointments and birthdays on them. But these pictures were so great, I didn't want to just throw away the calendar. So I decided to use them for bulletin boards for the next couple months. We started this week with penguins.
All three of my kids have been sick this week, so instead of supplementing our usual school work with things for the bulletin board, this is about all we did. We began by watching National Geographic-style videos of penguins on YouTube, and after we had watched a few, I asked the kids to tell me some things they had learned. We wrote those on paper and stuck them on the board around the picture of the penguin chicks. Another day, I read to them about penguins out of the children's encyclopedia we have, and again I had the kids tell me things they had learned. Daniel drew and cut out some fish one day, and Mercedes colored a picture of a parent penguin feeding a chick.
One day, I cut apart a map that showed penguin's habitats, turning it into a puzzle. Mercedes put the puzzle together and glued it onto a piece of construction paper.
While she was doing that, Daniel worked on his writing and spelling by writing out the word 'penguins.'
I tried to find a memory verse that tied in a little with what we were studying, but the best I came up with was "Then God said, 'Let the waters be full of living things.'" (Gen. 1:20) Maybe next week I'll find something a little more applicable, we'll see.
Wednesday, January 9, 2013
The Winter Game
I've been meaning to share this for a month now -- I took these pictures back in early December, but just haven't had a moment to sit down and write about it until now.
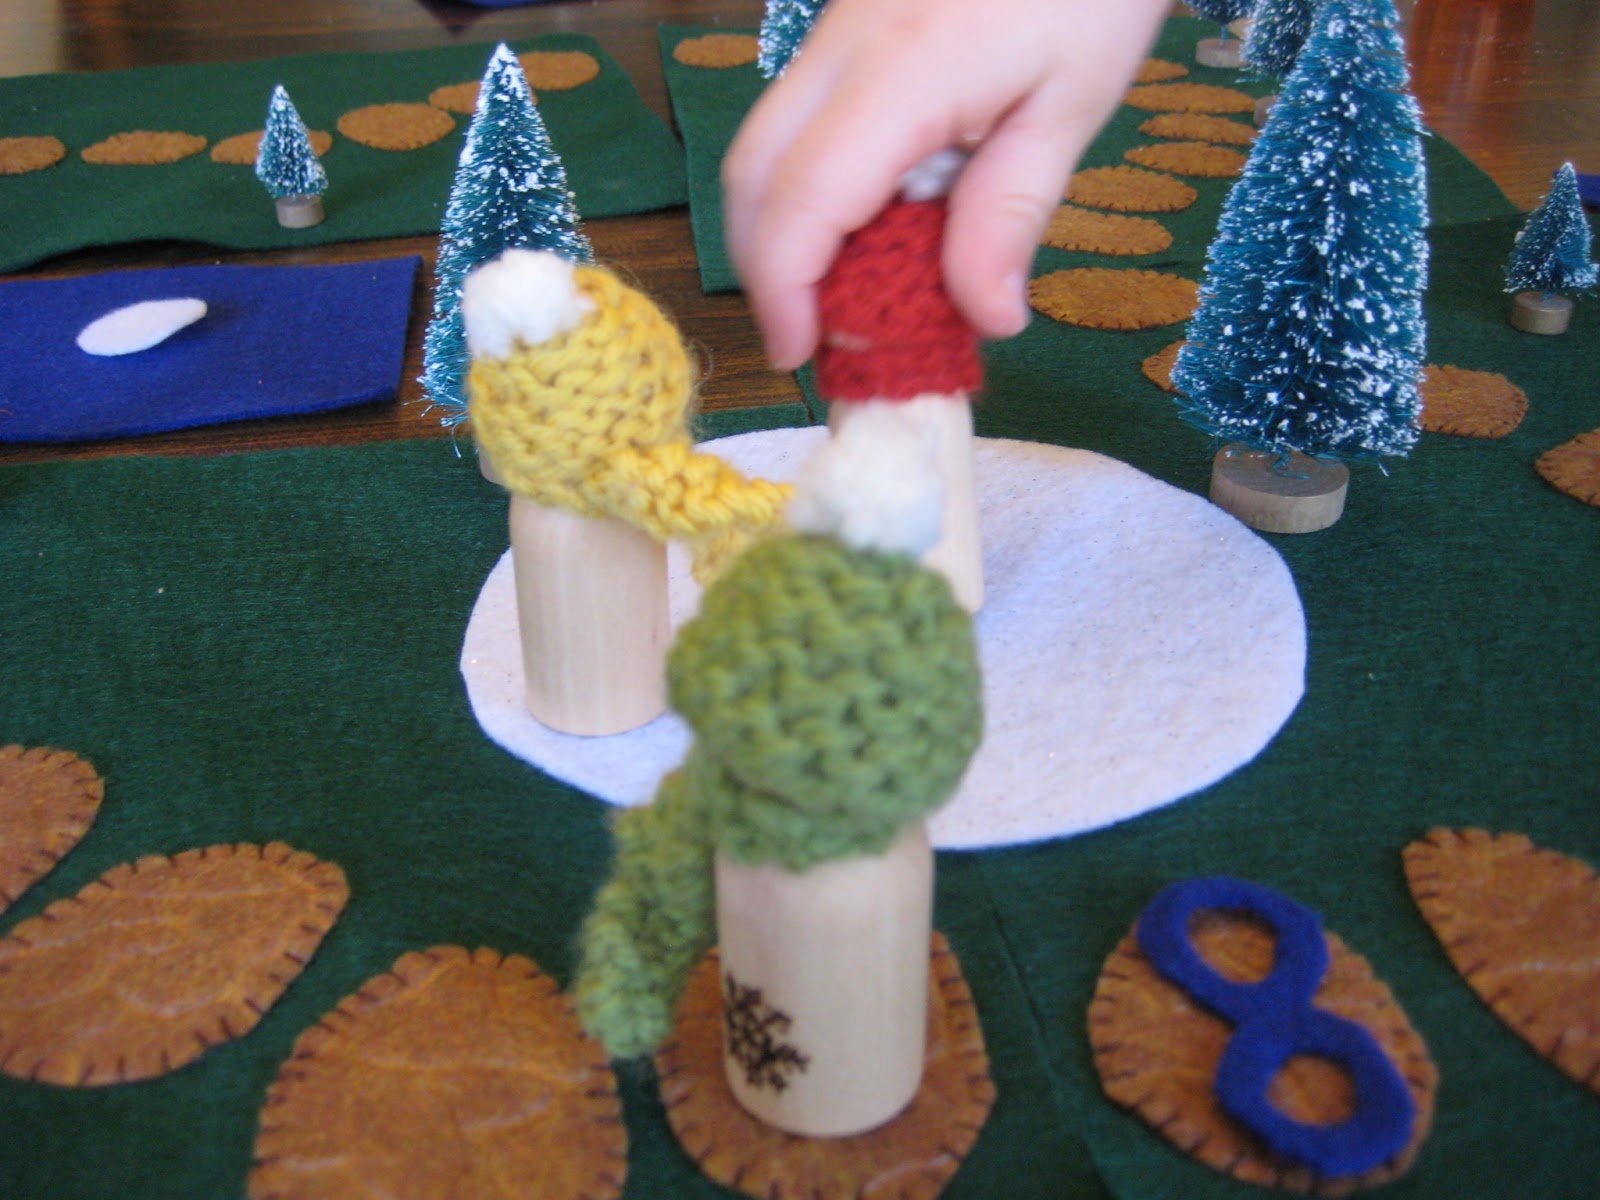
The Winter Game is something I dreamed up last fall, though it took me a couple of months to finish all of it. My inspiration came from three wooden peg dolls I bought from my friend Julie:
Their little hats and scarves are so sweet! And they each have a little snowflake burned onto them, see?
So I got these three pegs, and I thought, "What am I going to do with them?" I decided they should be game pieces, and over a couple of days, I dreamed up a winter-themed game that would encourage creative play by letting the players decide the layout of the board each time they play. Mercedes is working on counting and numbers, so I thought this could help her a bit with that as well.
I bought four green sheets of felt to make the playing "board," and also a sheet of felt that had this sort of rock pattern on it. I cut "stepping stones" from the rock felt and hand-sewed them on each piece of felt to form a path.
The kids can arrange these in any pattern they like. They do all fit together to make a loop if they want, but they can also make all sorts of other paths.
Once they set up their path, one person gets to decide where the Skating Pond goes. That's a big circle cut from white felt that has sparkles on one side.
Another player gets to decide where the little blue figure-eight goes -- if you land on that, you have to lose a turn because you go skating on the pond.
Then the third player gets to decide where the end of the game should be, and place the Hot Chocolate there. I cut that from red felt and sewed on a little brown dab of "cocoa" and a curl of steam. After all, when you're done playing outside in the snowy woods, you want to warm up with hot chocolate, right?
To play, you spin a little spinner I made from a heart-shaped piece of wood and a clock hand held on with a thumbtack, with numbers marked with a Sharpie.
There are two other parts of this game: snowmen and Christmas trees. The snowmen are just different-sized circles cut from the same sparkly white felt as the skating pond. Every time you spin a 3, you get to pick a piece for your snowman.
And every time you spin a 1, 2, or 4, you get to collect a small, medium, or large Christmas tree. I bought them in packs of 8 or 10 at a craft store, as I couldn't think of any good way to make ones that would stand up. Maybe by next winter, I'll have figured something out.
All the players get to place the trees and snowman pieces around the playing "board" before the game begins. There's not real "winning" to this game, as usually one person finishes their snowman first, another collects the most trees, and another gets to the Hot Chocolate first. I encourage my kids to make their playing pieces talk to each other about how much fun it is to play in the snow, what they want for Christmas, etc.
I used leftover felt from the hot chocolate mug to sew up a bag to put the little felt pieces and the peg dolls in.
Now that Christmas is over, I'm trying to think of ways to adapt this to work for other seasons too. I'm thinking a Spring Game could involve planting trees, picking flowers... we shall see!
Tuesday, January 1, 2013
Cinnamon Crescent Rolls
We had these on Christmas Eve morning, and ohhhh are they tasty! I meant to post the recipe this past week, but... never had time. Sigh. I've gotten more done today than I did all last week, which is just silly, but oh well.
The recipe is from here, but I've modified it a bit -- they added a glaze, but we all agreed they were better without the glaze. It made them too sweet, but without it, they were all yummy cinnamonness.
Cinnamon Crescent Rolls
Ingredients:
2 cans of refrigerated crescent rolls
1 stick of butter -- softened
1/2 cup brown sugar
1 Tbsp. ground cinnamon
Directions:
Preheat oven to 350. Combine everything but the rolls in a small bowl and beat until smooth. Separate the dough into triangles like you would for making crescent rolls. Spread a fairly thick layer of the cinnamon mixture on each triangle -- about 3 Tbsp per roll. Roll them up like you would to make crescent rolls (starting at the widest end). Place on an ungreased baking sheet and bake 10-15 minutes or until golden.
Happy New Year!
Thursday, December 20, 2012
Pine Cone Mice
As I've no doubt mentioned before, Daniel and Mercedes have decided they are mice. So when my friend Julie posted on her blog about making pine cone fairies with her girls, I immediately decided to try to change the craft a bit to make little mice instead. You can find the instructions for making pine cone fairies here on the Willodel blog. Here's how ours turned out:
I don't have wool for the arms and hair, so we dispensed with hair, and I wrapped a bit of fuzzy yarn around each arm to give them 'fur.' I also gave them tails of the yarn.
I sewed up the caps this morning, made from bits of leftover felt. Their little ears are also cut from felt and sewn on. The hats are supposed to look like elf hats, but they got kind of tall... oh well, they're still cute. I also glued the arms and heads on ahead of time so they could do the more fun parts of drawing faces and gluing on the hats, hands, and tails. I love how they turned out, and I'm hoping they'll survive until Christmas to decorate our table :-)
| Daniel's |
| Mercedes' |
| Abigail's (which I decorated for her) |
Tuesday, December 18, 2012
"The Little Drummer Boy" illustrated by Ezra Jack Keats
You probably know the Christmas song "The Little Drummer Boy" and its story of the Wise Men inviting a little boy to go with them to find and worship baby Jesus. There are plenty of different children's book versions of the song, but in my opinion, this is the best.
These illustrations by Ezra Jack Keats are splendid. Each one spreads across two pages, giving lots of room for action and detail. The artwork has a different feel from most of his other books, such as The Snowy Day -- they remind me a little of Eastern Orthodox religious artwork, in a way. I also love that he doesn't stick with the tradition of there being three Wise Men -- the Bible doesn't specify a number, and Keats pictures five, all with colorful, rich clothing and headwear.
In contrast to the rich Wise Men, the Little Drummer Boy is dressed very simply, as befits his stated status as "a poor boy."
I love this picture of just baby Jesus' little hand reaching out from his bed. Another picture of him shows him sitting on Mary's lap, and he's not at all a newborn, which tallies with the Bible's account that the Wise Men arrived when he was a toddler, not a newborn.
My favorite pictures in this book are the three done in silhouette. I especially love this one of the Wise Men approaching -- it's the first look we get of them, and they're so mysterious and alluring, and the colors are just breathtaking. They seem to have some assistants along as well, they're not just wandering around unassisted.
This is one of Mercedes' favorite books, and she asks to have it read before bed more than any other, all year 'round. She calls it "the rum-pum-pum book," and we actually have two copies, the paperback shown here, and also a board book version.
Monday, December 17, 2012
Snowman Cookie Pops
Inspired by the Reindeer Pop Treats I found on Pinterest a couple weeks ago, I dreamed up my own chocolate-dipped cookie project, which we tried out for the first time today.
I'm really pleased by how they turned out, although thanks to a rainy day, my pictures are not the best. But these are so cute that I had to share! They're great for giving as small gifts (we'll be giving several of these to friends at church) -- they fit perfectly in those little see-through snack bags you can find everywhere this time of year.
Here's what you'll need to make six of them:
Oreos
Round Nutter Butter cookies (optional) (come in package shown -- NOT regular Nutter Butters)
Creamy peanut butter
1 1/2 cup white chocolate chips
2 oz white baking chocolate -- chopped
6 popsicle sticks
Decorations (I used "writing icing," but you can use sprinkles or whatever)
Waxed paper
A microwaveable measuring cup or bowl
A spoon
A butter knife
And here's how you make them:
Open six Oreos and six Nutter Butter cookies, and scrape the filling out of them (it's not sticky enough). Spread creamy peanut butter on both halves.
Put one half of each kind of cookie next to each other, and put a popsicle stick on them as shown, so you have a decent handle sticking out, but it also sticks at least halfway into the cookie on the end (your snowman's head).
Put the tops back on the cookies, over the stick, and press them firmly together. I recommend getting all six cookie pops ready like this before moving on to the next step.
In a glass measuring cup or other microwaveable container, melt 1 1/2 cups of chocolate chips and the chopped baking chocolate for 1 minute in the microwave. Take out (careful, could be hot!) and stir, then microwave for another minute. Stir again, and microwave another 30 seconds if it's not smooth yet. Once it's smooth, dip your cookie pops in it and set on waxed paper to cool. Keep that stirring spoon handy in case any of your cookie halves fall off in the chocolate and need to be rescued. The dipping is a little tricky, so best suited to adults and older kids.
One the chocolate has hardened, decorate! Or, if you want to use sprinkles and things, add them before the chocolate is totally hard so they'll stick. I used decorator icing tubes to make faces and scarves. Here's what Daniel and Mercedes made:
The reason I used round Nutter Butters AND Oreos is because I was under the false impression that the Nutter Butters were smaller than Oreos, so I thought they'd look more like heads. And I didn't realize that their own filling would be too unsticky (we had several fall off the sticks into the chocolate -- casualties of experimentation, so sad), which is why we used the Oreos with peanut butter filling. Next time, I think we'll use store-brand "creme-filled chocolate sandwich cookies" to make these, and not bother with the Nutter Butters since they're the same size anyway.
But whatever we use, I know one thing: these cute little cookie pops will make us smile!
I'm really pleased by how they turned out, although thanks to a rainy day, my pictures are not the best. But these are so cute that I had to share! They're great for giving as small gifts (we'll be giving several of these to friends at church) -- they fit perfectly in those little see-through snack bags you can find everywhere this time of year.
Here's what you'll need to make six of them:
Oreos
Round Nutter Butter cookies (optional) (come in package shown -- NOT regular Nutter Butters)
Creamy peanut butter
1 1/2 cup white chocolate chips
2 oz white baking chocolate -- chopped
6 popsicle sticks
Decorations (I used "writing icing," but you can use sprinkles or whatever)
Waxed paper
A microwaveable measuring cup or bowl
A spoon
A butter knife
And here's how you make them:
Open six Oreos and six Nutter Butter cookies, and scrape the filling out of them (it's not sticky enough). Spread creamy peanut butter on both halves.
Put one half of each kind of cookie next to each other, and put a popsicle stick on them as shown, so you have a decent handle sticking out, but it also sticks at least halfway into the cookie on the end (your snowman's head).
Put the tops back on the cookies, over the stick, and press them firmly together. I recommend getting all six cookie pops ready like this before moving on to the next step.
In a glass measuring cup or other microwaveable container, melt 1 1/2 cups of chocolate chips and the chopped baking chocolate for 1 minute in the microwave. Take out (careful, could be hot!) and stir, then microwave for another minute. Stir again, and microwave another 30 seconds if it's not smooth yet. Once it's smooth, dip your cookie pops in it and set on waxed paper to cool. Keep that stirring spoon handy in case any of your cookie halves fall off in the chocolate and need to be rescued. The dipping is a little tricky, so best suited to adults and older kids.
One the chocolate has hardened, decorate! Or, if you want to use sprinkles and things, add them before the chocolate is totally hard so they'll stick. I used decorator icing tubes to make faces and scarves. Here's what Daniel and Mercedes made:
| Daniel's Snowman Cookie Pops |
| Mercedes' Snowman Cookie Pops |
But whatever we use, I know one thing: these cute little cookie pops will make us smile!
Sunday, December 16, 2012
"Cranberry Christmas" by Wende and Harry Devlin
I love the Christmas season, and I love books and movies about Christmas. I'm going to try to share a few of my favorite Christmas children's books here this week, beginning with one we got from the library yesterday. I remember getting this book (and one of its predecessors, Cranberry Thanksgiving) from the library when I was a little kid, and I'm delighted to say they're as good as I remembered. I love it when that happens!
In Cranberry Christmas, young Maggie's friend Mr. Whiskers faces two problems: mean Cyrus Grape, who claims no one can skate on the pond because he owns it, and Mr. Whiskers' sister, who wants to make Mr. Whiskers leave his home in Cranberryport and move in with her in the city. With Maggie and her Grandmother's help, Mr. Whiskers thwarts them both.
I absolutely love the illustrations in this book. Here are my favorites:
Do you and your children have favorite Christmas or winter books? Please share! I'm always on the lookout for new books to introduce the kids to.
In Cranberry Christmas, young Maggie's friend Mr. Whiskers faces two problems: mean Cyrus Grape, who claims no one can skate on the pond because he owns it, and Mr. Whiskers' sister, who wants to make Mr. Whiskers leave his home in Cranberryport and move in with her in the city. With Maggie and her Grandmother's help, Mr. Whiskers thwarts them both.
I absolutely love the illustrations in this book. Here are my favorites:
| Maggie and Mr. Whiskers skating |
| Mr. Whiskers declaring his outrage to Grandmother and Maggie |
| My favorite illustration of all |
Do you and your children have favorite Christmas or winter books? Please share! I'm always on the lookout for new books to introduce the kids to.
Friday, December 7, 2012
My Baby Elf
{this moment} - A Friday ritual. A single photo - no words - capturing a moment from the week. A simple, special, extraordinary moment. A moment I want to pause, savor and remember. (from SouleMama)
Thursday, December 6, 2012
Mackinac Island Fudge
I used this recipe for the first time this week and took some to the Advent supper at church, where it made me several new friends. I got it from the latest (Dec/Jan) issue of Taste of Home, and in a couple of months it will likely be available on their website, but for now it's members-only there. But I'm going to share it here because so many people have asked for it, and so I'll just change the wording to make it my own and not infringe on their copyrights :-)
When I was a kid, we lived in Michigan, and one of our favorite places to go as a family was Mackinac Island. We only went there a handful of times, as it's waaaaaaaaaaaaaaaaaaaaaaay up north, hours and hours from where we lived, but we loved it a great deal. Mackinac Island doesn't allow motorized vehicles, and it has a bunch of nifty historical stuff to do -- check out the link above or Google for more info. One of my mom's favorite movies, Somewhere in Time (1980) was filmed at the Grand Hotel there. But anyway, one of the best things about Mackinac Island is the wonderful, creamy, ultra-chocolatey fudge they make there. You can buy that fudge in a few Kilwin's stores around the country, or online... or you can make some yourself! This isn't precisely the same, but it's the best approximation I've ever made, for sure.
Mackinac Island Fudge
Ingredients:
1 cup plus 2 tsp butter -- divided
4 cups sugar
1 cup 2% milk
25 large marshmallows
1 pkg (11 oz) milk chocolate chips
1 pkg (12 oz) semisweet chocolate chips
2 oz unsweetened chocolate -- chopped
1 tsp vanilla extract
Directions:
Line a 13"x9" baking pan with foil; use the 2 tsp of butter to grease the foil -- you may want someone to hold the foil in place around the edges while you do this.
Put marshmallows in a large bowl.
Combine sugar, milk, and 1 cup of butter in a large saucepan. Bring to a rapid boil over medium heat, stirring constantly. Boil gently for 2 minutes without stirring. Remove from heat. Pour over marshmallows, and stir until they are melted. Then stir in all the chocolate until it's melted too. Stir in the vanilla extract. Immediately pour into the foil-lined pan and spread to the edges. Let cool for 1 hour on the counter.
Score the fudge into 1-inch squares. Cover and refrigerate for 3 hours or until firm. Use the foil to lift the fudge out of the pan and place on a cutting board. Cut fudge along scored lines. Store in the fridge in an airtight container between layers of waxed paper.
Note: This makes a LOT of fudge! About 100 pieces, to be honest. So it's great for sharing, taking to a potluck, etc. Also, my batch was much better after it sat in the fridge overnight, so if it seems a little too sweet when you're cutting it (cuz you know you're gonna taste it), don't despair!
Wednesday, December 5, 2012
"Puzzle Patch" Puzzles
A few weeks ago at Walmart, I found some puzzle sets that I thought would be a great addition to our classroom puzzle time. They're the kind that have a cardboard back and frame that all the pieces then fit into. Daniel was especially excited because one of the puzzles had all sorts of trains. It looked to me like the set with the train was harder puzzles, and the other set would be easier ones for Mercedes -- you could only see two of the puzzles, and then a little piece of paper showed the pictures of all the puzzles. They were $5 for a set of four, which seemed like a good deal.
Was I ever wrong!
First of all, the "easy" set only had one easy puzzle with shapes. The others have at least 25 pieces each, and the one of the alphabet has 26 non-interlocking pieces that are just crazy hard for even Daniel to figure out. So much for that being a good way to teach Mercedes her alphabet!
Second, these puzzles come all stuck together still, and once we'd separated all the pieces and tried putting them back together, the little tangs of cardboard left where they'd been attached made them not fit together within their frames anymore! You can put them together outside the frame, but then what's the point of having the frame and back?
I've spent at least half an hour per puzzle carefully cutting off all the little tangs so they'll work the way they're intended. So once again, let the buyer beware -- if $5 for 4 puzzles sounds like it might be a little too good to be true, it probably is.
Minus all the headaches of them not fitting together, though, these are really colorful puzzles that do have some educational benefits -- the United States puzzle has given Daniel some sense of where we live and where our families come from, and we've had fun tracing the routes of various trips we've taken. The fish and animal puzzles are nice for them to learn to identify different animals and fish, and Mercedes does enjoy putting the shapes puzzle together, though the other ones she needs constant help with.
Subscribe to:
Posts (Atom)